

Replacing Cracked Phone Screens: A Step-by-Step Guide
Replacing a cracked phone screen might look like something best left to professionals, but replacing it yourself is entirely possible with the right prep. Most people do not realise you can get your device working again with just a handful of widely available precision tools and some patient steps. In fact, using a plastic pry tool and anti-static mat can drop the risk of accidental device damage to nearly zero during a DIY screen swap. It sounds daunting, yet the real surprise is how methodical preparation and patience make phone repair achievable at home—no tech genius required.
Table of Contents
- Step 1: Gather All Necessary Tools And Materials
- Step 2: Power Down And Safely Disassemble Your Device
- Step 3: Remove The Cracked Screen And Clean The Surface
- Step 4: Install The New Screen Accurately
- Step 5: Reassemble The Phone With Precision And Care
- Step 6: Conduct A Functionality Test To Ensure Quality
Quick Summary
| Key Point | Explanation |
|---|---|
| 1. Assemble the right tools | Gather precision screwdrivers, pry tools, and anti-static materials for efficient screen replacement. |
| 2. Document the disassembly process | Take clear photographs of each step to ensure proper reassembly and track component placement. |
| 3. Remove the cracked screen with care | Use heat to loosen adhesive and gently separate the screen, avoiding damage to internal components. |
| 4. Test the new screen before sealing | Perform a preliminary connection test to ensure the new screen functions correctly before final installation. |
| 5. Conduct a comprehensive functionality test | After reassembly, verify all smartphone features work properly to confirm a successful repair. |
Step 1: Gather all necessary tools and materials
Replacing cracked phone screens requires careful preparation and the right equipment. Before diving into the repair process, assembling a comprehensive toolkit will make your screen replacement smoother and more efficient. Professional repair technicians understand that proper preparation can mean the difference between a successful repair and a potential device disaster.
The essential toolkit for replacing cracked phone screens should include precision tools designed specifically for mobile device repairs. You will need a set of small precision screwdrivers with magnetic tips to handle delicate smartphone components. A plastic pry tool or spudger is crucial for safely separating the screen from the device body without causing additional damage. Tweezers with fine, non-conductive tips help manipulate small connectors and components with minimal risk.
Additionally, protect your workspace and device by acquiring an anti-static mat and anti-static wrist strap. These items prevent potentially catastrophic static electricity discharge that could permanently damage sensitive electronic components. Clean microfibre cloths and isopropyl alcohol will help prepare surfaces and remove dust or residue during the repair process.
Your parts inventory should include the replacement screen assembly compatible with your specific smartphone model. Purchase from reputable suppliers who offer quality components with warranty coverage. Matching screen assemblies precisely to your device model prevents compatibility issues and ensures optimal performance after replacement.
Pro tip: Invest in proper lighting with a magnifying lamp or headlamp to improve visibility when working with tiny smartphone components. Wear comfortable, well-fitting examination gloves to maintain a clean working environment and protect both your hands and the delicate electronic parts.
Before beginning the repair, create a clean, well-organized workspace with ample room to lay out your tools and device. A white or light-colored surface helps you track small screws and components. Having a small magnetic parts tray can prevent losing critical tiny pieces during the screen replacement process.
Below is a table summarising the essential tools and materials needed for a successful phone screen replacement, including their purpose for the process.
| Tool/Material | Purpose | Additional Notes |
|---|---|---|
| Precision screwdrivers | Remove and replace tiny screws in the device | Magnetic tips recommended |
| Plastic pry tool/spudger | Safely separate screen and back cover | Reduces risk of internal damage |
| Fine-tipped tweezers | Handle small connectors and components | Non-conductive tips |
| Anti-static mat & wrist strap | Prevent static electricity damage | Essential for protecting components |
| Microfibre cloths & alcohol | Clean surfaces and remove adhesive residue | Use isopropyl alcohol for electronics |
| Replacement screen assembly | Replaces damaged screen | Ensure model compatibility |
| Magnetic parts tray | Hold and organise screws and tiny parts | Prevents losing critical components |
| Magnifying lamp or headlamp | Enhance visibility for small components | Good lighting reduces error risk |
| Examination gloves | Maintain cleanliness and protect hands/components | Well-fitting gloves recommended |
Additional Considerations for Successful Repair
While gathering tools, also prepare a digital workspace. Take clear photographs of your device at each disassembly stage using a smartphone or digital camera. These images serve as visual references for reassembly and help track component placement. Consider watching professional repair tutorials specific to your smartphone model to familiarize yourself with the unique disassembly requirements.
Remember that patience and methodical preparation are your greatest assets when replacing cracked phone screens. Rushing or skipping preparation steps increases the risk of causing additional damage to your valuable device.
Step 2: Power down and safely disassemble your device
Safety and methodical approach are paramount when beginning the screen replacement process. Powering down and disassembling your smartphone requires precision and careful attention to prevent additional damage to your device. This critical step sets the foundation for a successful repair and minimizes the risk of electrical short circuits or component damage.
Completely power off your device by holding down the power button and selecting the shutdown option. If the screen is severely cracked and unresponsive, press and hold the power button for 10-15 seconds to force a complete shutdown. Remove the battery if it is removable, though most modern smartphones have integrated batteries that require additional steps.
For devices with removable back covers, use your plastic pry tool to carefully separate the back panel. Apply gentle, consistent pressure along the edges, working slowly to avoid cracking or breaking the cover. Some smartphones might require removing small screws at the bottom or sides before the back panel can be safely removed. Keep these screws in a magnetic parts tray to prevent losing them during the repair process.
Before deeper disassembly, document your device’s current state. Take clear, well-lit photographs from multiple angles. These images will serve as a crucial reference point during reassembly and help track the precise location of internal components. Professional repair technicians always recommend creating a visual documentation trail before starting any intricate repair work.
Handling Delicate Internal Components
As you begin internal disassembly, ground yourself to prevent static electricity discharge. Connect your anti-static wrist strap and work on an anti-static mat. Use your precision screwdrivers to carefully remove any screws securing the device’s internal frame. Pay close attention to different screw sizes and lengths, as smartphone manufacturers often use multiple screw types in a single device.
Carefully disconnect the battery connector from the motherboard using your fine-tipped tweezers. This step prevents any potential electrical complications during the screen replacement process. Some devices might require specific techniques or tools to safely disconnect internal components, so consulting model-specific repair guides can provide additional guidance.
Take your time and maintain a calm, methodical approach. Rushing through the disassembly can lead to irreversible damage. If you encounter unexpected resistance or feel uncertain about a particular step, pause and consult professional repair resources or seek expert advice. Remember that patience is your most valuable tool when replacing a cracked phone screen.
By the end of this step, your device should be fully powered down, back cover removed, and internal components carefully disconnected. Your careful preparation sets the stage for the next phase of screen replacement, ensuring a higher likelihood of a successful repair.
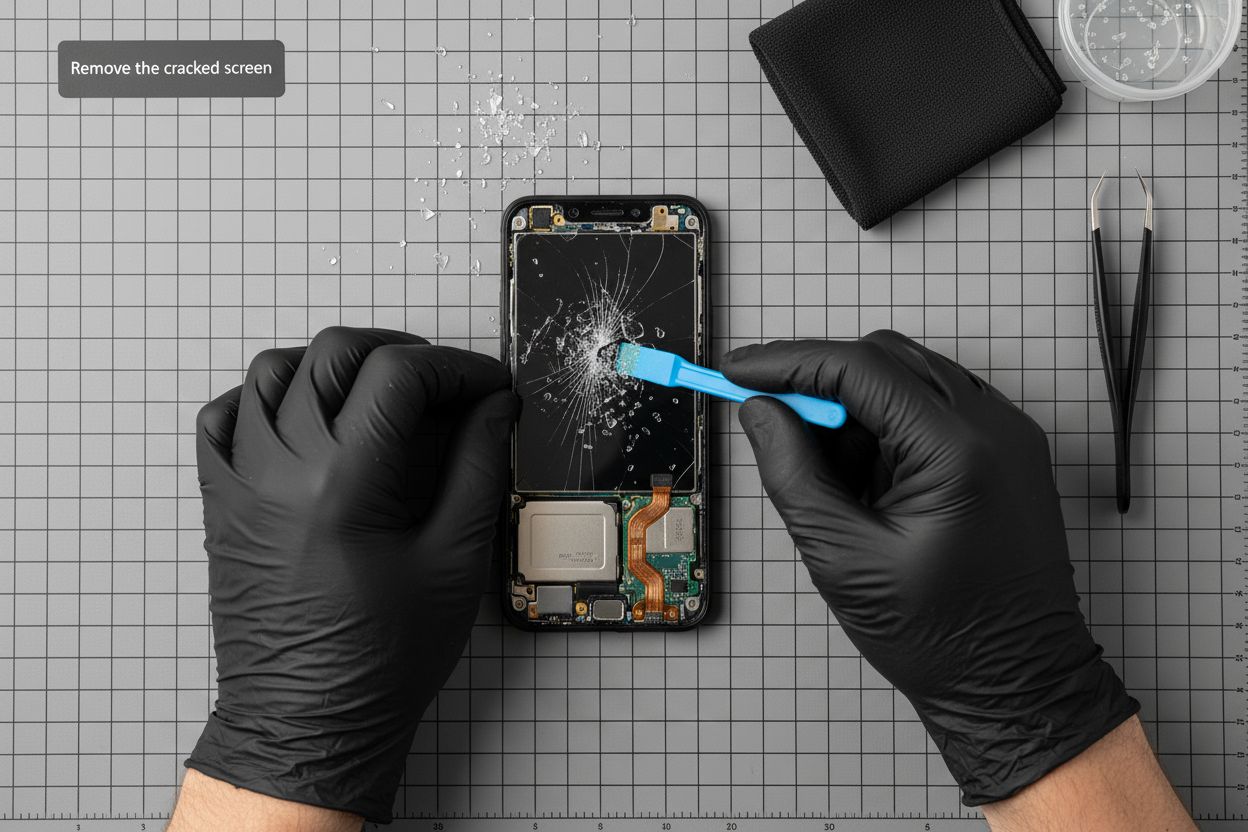
Step 3: Remove the cracked screen and clean the surface
Removing a cracked screen requires precision, patience, and controlled technique. This step transforms your damaged device by carefully separating the broken screen assembly from the smartphone’s internal components. Understanding the delicate nature of this process will help you minimize potential additional damage during removal.
Begin by applying heat using a professional-grade heat gun or hairdryer set to low temperature. Warming the adhesive around the screen’s edges helps loosen the screen assembly, making removal easier and reducing the risk of internal component damage. Move the heat source continuously and maintain a distance of approximately 10-15 centimetres to prevent overheating sensitive electronics.
Once the adhesive softens, use your plastic pry tool to create a small separation between the screen and device frame. Work slowly and methodically, applying gentle pressure at multiple points around the screen’s perimeter. Avoid using metal tools that might scratch or puncture the device’s internal components. Insert the plastic pry tool at the corners first, gradually working your way around the screen’s edges.
As you separate the screen, pay close attention to any ribbon cables or connectors still attached. These delicate components require careful handling to prevent tearing or disconnection. Use fine-tipped tweezers to support and guide these connections during removal. If resistance increases, pause and reapply gentle heat to further soften the adhesive.
Preparing the Device Surface
After completely removing the damaged screen, inspect the device’s internal frame for any remaining adhesive residue or glass fragments. Use isopropyl alcohol and clean microfibre cloths to carefully clean the surface. This step is crucial for ensuring a proper seal with the new screen assembly. Gently wipe the area, avoiding excessive pressure that might damage underlying components.
Check the frame for any signs of additional damage caused by the cracked screen. Hairline cracks or bent metal can compromise the new screen’s installation. If you notice significant structural damage, consider consulting a professional repair technician who can assess and potentially repair the device frame.
Inspect the device’s internal connectors and mounting points. Ensure they are clean, undamaged, and free from dust or debris. Use compressed air or an anti-static brush to remove any microscopic particles that might interfere with the new screen’s installation. A clean, well-prepared surface is essential for achieving a secure and functional screen replacement.
By the end of this step, you should have a completely removed cracked screen and a clean, prepared device surface ready for the new screen assembly. Your meticulous approach during this stage significantly increases the likelihood of a successful repair.
Step 4: Install the new screen accurately
Installing a new screen represents the most critical phase of your smartphone repair journey. Precision and patience are essential to ensure a successful screen replacement that restores your device’s functionality and appearance. This step transforms your damaged smartphone back into a fully operational device.
Carefully align the new screen assembly with the device’s internal frame, paying extremely close attention to connector placement and positioning. Begin by gently connecting the primary ribbon cable, using fine-tipped tweezers to guide the delicate connector into its precise socket. Apply minimal pressure to avoid bending or damaging the sensitive connection points. Professional technicians recommend viewing this process as a delicate dance of alignment rather than a forceful installation.
Before fully securing the screen, perform a preliminary connection test. Temporarily reconnect the battery connector and power on the device to verify that touch functionality and display work correctly. This quick diagnostic check allows you to identify any potential connection issues before completing the final installation. If the screen responds correctly, power down the device and proceed with the permanent installation.
Apply a thin, even layer of manufacturer-recommended adhesive around the device’s frame. Avoid using excessive amounts of adhesive, which can cause uneven mounting or potential damage to internal components. Some screen assemblies come with pre-applied adhesive, eliminating the need for additional bonding material. Carefully lower the new screen onto the frame, starting from one edge and gradually pressing down to ensure complete and uniform contact.
Final Positioning and Verification
Use your plastic pry tool to make final adjustments, ensuring the screen sits perfectly flush with the device’s frame. Check for any gaps or misalignments around the edges. Slight pressure applied evenly around the screen’s perimeter helps create a secure seal. Take your time during this process, as rushed installation can lead to long-term functional issues.
After securing the screen, reattach all previously disconnected components. This includes reconnecting the battery, replacing internal brackets, and securing any additional connectors. Use your earlier photographs as a reference to ensure everything returns to its original position. Precision during reassembly prevents potential electrical or mechanical complications.
Finalize the repair by replacing the device’s back cover or frame components. Carefully reinsert and tighten all screws, ensuring they are snug but not over-tightened. Excessive force can strip threads or damage the delicate internal structure of your smartphone.
By the end of this step, you should have a newly installed screen that appears seamlessly integrated with your device. The true test comes when you power on the smartphone and verify that all functions work perfectly. Your methodical approach throughout the screen replacement process significantly increases the likelihood of a successful repair.
Step 5: Reassemble the phone with precision and care
Reassembling your smartphone after screen replacement requires the same meticulous approach used during disassembly. This critical stage determines whether your repair will result in a fully functional device or potentially create additional complications. Your previous careful documentation and methodical work now come into play as you reconstruct the smartphone’s intricate internal ecosystem.
Begin by systematically replacing internal components using your earlier photographs as a precise reference guide. Start with the smallest and most delicate elements first, such as flex cables and connector brackets. Use your fine-tipped tweezers to position these components exactly as they were originally mounted. Each piece must be seated correctly to ensure proper electrical connections and mechanical alignment.
Carefully reconnect the battery connector, ensuring it sits flush and secure. Apply minimal pressure, using a gentle rocking motion if needed to seat the connector properly. Misalignment at this stage can prevent the device from powering on or cause intermittent electrical issues. Your attention to detail during this step is paramount to the overall success of the screen replacement process.
Reinstall any protective metal shields or brackets that cover sensitive electronic components. These small elements play a crucial role in protecting internal circuitry and maintaining the device’s structural integrity. Use your precision screwdriver to replace screws, remembering to match each screw to its original location. Different smartphones use varying screw lengths and types, so referencing your earlier documentation is essential.
Final Assembly and Verification
As you approach the final stages of reassembly, inspect each component and connection point carefully. Look for any signs of misalignment, dust, or potential damage. Use compressed air or an anti-static brush to remove any microscopic particles that might have accumulated during the repair process. A clean assembly reduces the risk of future technical complications.
Carefully replace the back cover or frame, ensuring all edges align perfectly. Apply even, gentle pressure to secure the cover without forcing it. Listen for the subtle click that indicates proper seating. Avoid overtightening any screws, as this can damage the delicate internal frame or create stress points that might compromise the device’s structural integrity.
Before considering the repair complete, perform a comprehensive functionality test. Power on the device and systematically check all critical functions:
- Touch screen responsiveness
- Display color and brightness
- Connectivity features
- Camera functionality
- Sound output
- Charging port performance
By the end of this step, your smartphone should be fully reassembled and functioning exactly as it did before the screen replacement. Your patience, precision, and methodical approach have transformed a damaged device into a fully operational smartphone.
Step 6: Conduct a functionality test to ensure quality
The final stage of screen replacement involves a comprehensive functionality test that validates the success of your repair. This critical step transforms your technical work from a potentially risky procedure into a confirmed restoration of your smartphone’s performance. Approach this assessment methodically, treating each function as an important diagnostic checkpoint.
Power on the device and observe the initial boot sequence carefully. Note any unusual delays, unexpected screen behaviors, or error messages. The first startup provides immediate insights into the quality of your screen installation and internal component connections. Watch for smooth screen illumination, consistent color representation, and responsive touch interactions during this initial phase.
Test the touchscreen’s entire surface sensitivity by systematically checking each area. Open applications that require precise touch inputs, such as drawing apps or games with complex control mechanisms. Move your finger across all screen regions, verifying that every pixel responds accurately and consistently. Pay special attention to corner regions and edges, which are often problematic during screen replacements.
Evaluate all core smartphone functionalities systematically. This includes testing cellular connectivity, WiFi performance, Bluetooth pairing, and GPS accuracy. Make calls to verify audio quality through both the earpiece and speaker. Use the camera applications to check front and rear camera functionality, ensuring image quality matches the device’s original performance standards.
Comprehensive Performance Verification
Conduct battery and charging tests to confirm the device’s electrical systems remain intact. Connect the charger and monitor charging speed and battery percentage progression. Verify that the device charges at the expected rate and maintains battery performance consistent with its pre-repair condition. Unexpected charging behaviors might indicate underlying connection issues from the screen replacement process.
Run diagnostic applications that can provide deeper insights into hardware performance. These tools can detect subtle issues that might not be immediately apparent during standard usage. Check for any temperature anomalies, unexpected battery drain, or intermittent component malfunctions. Professional repair technicians recommend running these diagnostics for at least 24-48 hours to ensure complete system stability.
If you encounter any functionality issues during testing, do not panic. Minor problems can often be resolved by carefully repeating specific reassembly steps or reconnecting internal components. Should significant problems persist, consulting a professional repair technician might be the most prudent course of action.
By thoroughly testing each aspect of your smartphone, you transform a potentially risky repair into a successful device restoration.
This checklist table helps you verify all aspects of your phone are working correctly after a screen replacement, ensuring nothing is overlooked before completing the process.
| Functionality Area | How to Verify | Confirmation Criteria |
|---|---|---|
| Touchscreen Responsiveness | Test touch across whole screen with various apps | All areas respond accurately |
| Display Quality | Observe colour, brightness and clarity | No dead pixels or flickering |
| Camera Functionality | Open camera app, test front and rear cameras | Images are sharp and as before |
| Connectivity | Test mobile network, WiFi, Bluetooth, GPS | All connect without issues |
| Sound Output | Play audio through speakers and headphones | Sound is clear and undistorted |
| Charging | Connect charger and monitor battery progress | Charges at regular speed |
| Button Operation | Press all physical buttons (power, volume etc) | All respond correctly |
Ready for a Flawless Screen Repair? Trust Genuine Parts and Professional Support
Experiencing the stress of a cracked phone screen can disrupt your day and put your device at further risk. Even with a detailed step-by-step guide, sourcing reliable parts and the right tools for your specific mobile phone is often the toughest challenge. From ensuring compatibility with your exact model to avoiding low-quality components that might fail after installation, every repair step depends on the quality of your materials. If you have ever worried that the wrong screen assembly or tool could cause more harm during disassembly, or if you want confidence that your replacement will pass every functionality test, you are not alone.
Reduce your risk and save both time and money by choosing Buy2fix as your trusted repair partner. We stock only the best quality mobile phone repair parts, tested and verified for models including iPhone, Samsung, Huawei, and more. Whether you need a precise LCD screen assembly or small items like charging ports and flex cables, our comprehensive range will support every preparation and installation stage. Benefit from free UK mainland shipping, a robust 30-day return policy, and professional guidance for every order. Get your repair right the first time—visit https://buy2fix.co.uk now and ensure your screen replacement project is a long-term solution, not a temporary fix.
Frequently Asked Questions
What tools do I need for replacing a cracked phone screen?
To replace a cracked phone screen, you’ll need small precision screwdrivers, a plastic pry tool, tweezers, an anti-static mat, and an anti-static wrist strap. Additionally, it’s essential to have a replacement screen assembly compatible with your phone model and cleaning materials such as microfibre cloths and isopropyl alcohol.
How can I safely disassemble my smartphone for screen replacement?
Begin by completely powering off your device. If the screen is unresponsive, hold the power button for 10-15 seconds. Use a plastic pry tool to gently separate the back cover and document the disassembly with photographs. Ground yourself to prevent static discharge and carefully remove screws and internal connections using precision tools.
What should I do if my replacement screen does not fit properly?
Ensure that you have purchased a screen assembly specifically compatible with your smartphone model. If the replacement screen does not fit, check for any remaining adhesive or damage on the frame. Revisit the installation steps to confirm proper alignment and connection of all components to achieve a secure fit.
How do I test the functionality of my phone after screen replacement?
After replacing the screen, power on the device and observe the boot sequence for any abnormalities. Check the touchscreen responsiveness across its entire surface, test cellular and WiFi connectivity, and verify camera functionality. Additionally, monitor the charging process to ensure everything is operating correctly.
Recommended
- Front Screen Outer Glass Lens with OCA Optically Clear Adhesive for Xi – buy2fix
- Front Screen Outer Glass Lens with OCA Optically Clear Adhesive for Xi – buy2fix
- Front Screen Outer Glass Lens with OCA Optically Clear Adhesive for Xi – buy2fix
- For OPPO R17 / R17 Pro Front Screen Outer Glass Lens with OCA Opticall – buy2fix
Let customers speak for us
For Samsung Galaxy A26 SM-A266B Original Earpiece Speaker with Cable

Very good communication throught. Good product

Well made part very strong easy to fit great value for the money

Well packed, with fast shipping :)

Exactly what the doctor ordered…great color, comfort, and durability. Trust this watch band!

Brilliant strap, second purchase, bought bracelet before. Excellent value. Thank you

Great item for splitting your Audio signal

Outstanding product!
Next level customer service.

Very satisfied but the delivery needs to get more faster...

Good price,quick delivery

Best phone case ever! This is my second one as I broke my first. Would defo recommend

Great fitting Apple Watch bands

For Apple Watch Ultra 3 / 2 / 1 49mm RedPepper Armor Metal Case Integrated Silicone Watch Band(Steel Black White)

Good price and quick postage

