

iPhone camera glass replacement cost guide 2026
TL;DR:
- Cracked iPhone camera glass can impair photo quality and cause internal damage if untreated.
- Replacement costs vary based on iPhone model, part quality, repair type, and location in the UK.
- DIY repairs are cheaper but risk damaging the camera module; professional repair offers warranties and expertise.
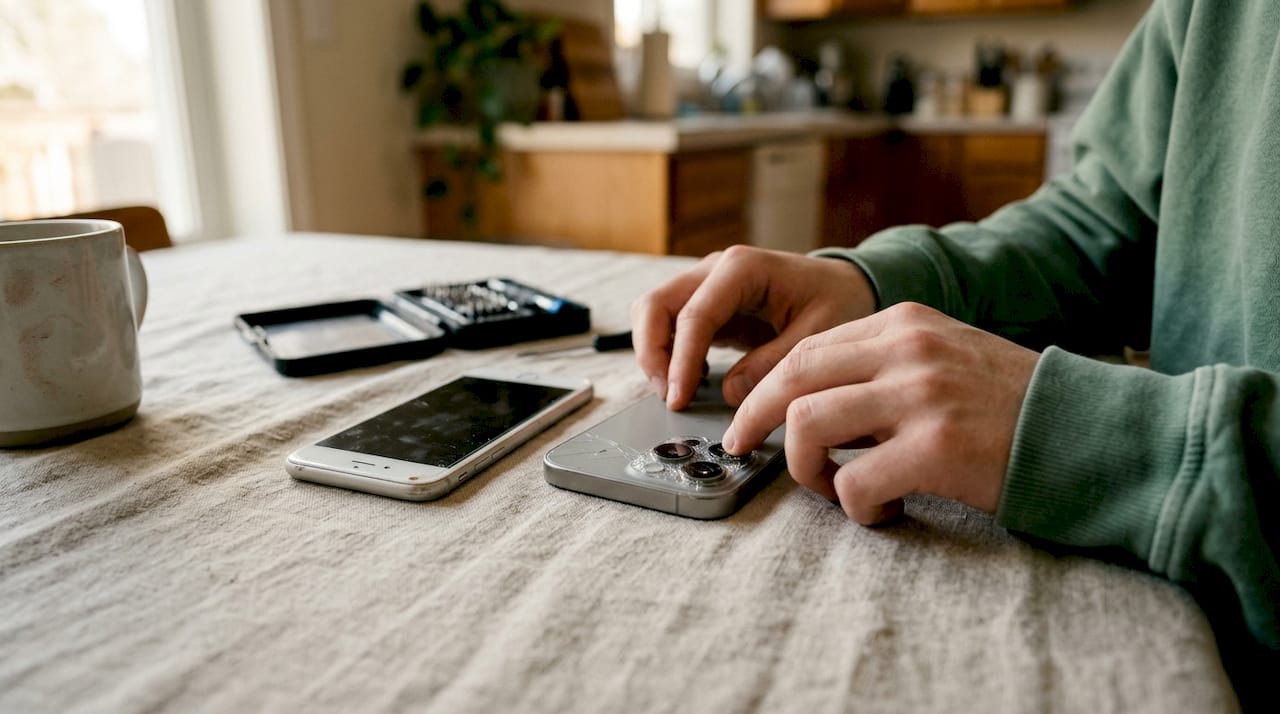
A cracked iPhone camera glass is one of those problems that catches you completely off guard. One moment your photos are crisp and clear, the next there’s a spiderweb of cracks distorting every shot you take. Many people assume the repair will cost a fortune, while others underestimate it entirely. The truth sits somewhere in the middle, and knowing exactly what you’re dealing with makes all the difference. This guide breaks down the real costs of iPhone camera glass replacement in the UK, what drives those prices up or down, and how to decide whether DIY or professional repair is the smarter move for your situation.
Table of Contents
- Why iPhone camera glass breaks and the true impact
- What determines the cost of iPhone camera glass replacement?
- DIY vs professional repair: Which saves more?
- Step-by-step: Safely replacing your iPhone camera glass
- What most people get wrong about iPhone camera glass repair
- Find quality iPhone camera repair parts and support
- Frequently asked questions
Key Takeaways
| Point | Details |
|---|---|
| Costs vary by model | Camera glass replacement costs more for newer or premium iPhone models and less for older or basic versions. |
| DIY saves money but comes with risk | You can save by replacing the glass yourself, but mistakes can damage your phone or void your warranty. |
| Professional repair is safer for valuable phones | Paying extra for a professional repair can protect your investment and guarantee the work. |
| Quality parts are key | Always source replacement glass from reputable suppliers to ensure clear photos and fit. |
Why iPhone camera glass breaks and the true impact
The camera glass on your iPhone is tougher than it looks, but it’s not indestructible. Most cracks happen in three predictable ways: drops onto hard surfaces, pressure from sitting on the phone in a back pocket, and contact with sharp objects like keys in a bag. Even a short drop onto concrete at the wrong angle can shatter the lens cover completely.
What makes this damage more serious than a scratched back panel is the direct effect on your photography. A cracked lens distorts light entering the camera module, producing blurry, hazy, or streaky images. In some cases, the autofocus system struggles to lock on correctly, and low-light performance drops noticeably. These aren’t just cosmetic issues.
The bigger concern is what happens when you leave it untreated. Camera glass cracks can lead to blurry photos and even internal damage if moisture or dust enters through the broken seal. Once debris reaches the camera sensor or the optical image stabilisation mechanism, you’re looking at a far more expensive repair than a simple glass swap.
Here’s a quick summary of the most common causes:
- Dropping the phone onto hard or rough surfaces
- Pressure damage from sitting or leaning on the device
- Sharp objects scratching through to a crack
- Thermal stress from extreme temperature changes
- Low-quality cases that don’t protect the camera module
Cracked camera glass isn’t just a cosmetic issue. It’s an entry point for dust and moisture that can silently destroy internal components over time.
If you’re already dealing with damage, it’s worth reviewing your repair options for cracked iPhone to understand the full picture before committing to any one approach. Acting quickly genuinely protects your phone’s long-term value and performance.
With an understanding of the urgency, it’s important to know what goes into the cost.
What determines the cost of iPhone camera glass replacement?
The price of replacing iPhone camera glass in the UK isn’t fixed. Several variables push it up or pull it down, and understanding them helps you budget accurately and avoid nasty surprises.
iPhone model is the biggest single factor. Newer flagship models like the iPhone 15 Pro Max use more complex multi-lens assemblies with tighter tolerances, making both the parts and the labour more expensive. Older models like the iPhone 11 or 12 are simpler and cheaper to fix.
Part quality matters enormously. You’ll encounter two main categories: OEM (original equipment manufacturer) parts, which match Apple’s specifications closely, and third-party aftermarket parts, which vary widely in quality. OEM or high-grade aftermarket glass costs more but performs better and lasts longer.
Repair type is the third major driver. Replacement camera glass parts alone typically range from £10 to £30, but professional repair charges can add £30 to £100 depending on the model and service provider. That’s a significant gap, and it reflects the skill, tools, and warranty a professional brings.
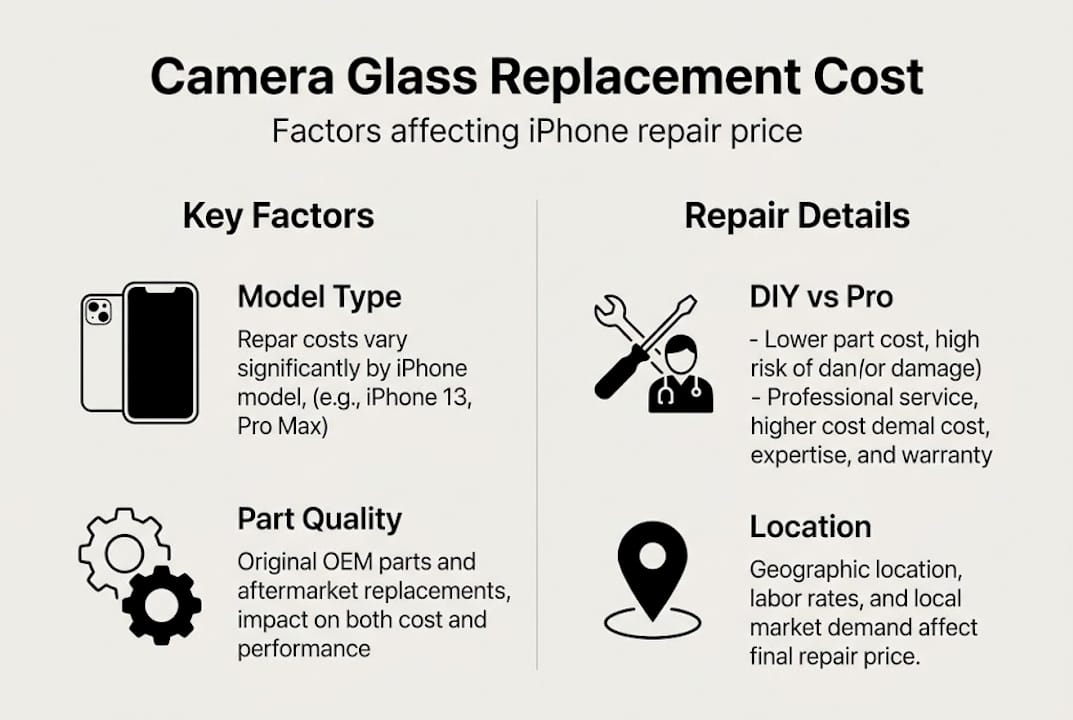
Location also plays a role. Repair shops in London and other major cities tend to charge more than independent technicians in smaller towns. Online DIY purchasing sidesteps this entirely.
Here’s a rough comparison of what you might expect to pay for common models:
| iPhone model | DIY part cost | Professional repair total |
|---|---|---|
| iPhone 11 | £10 to £15 | £40 to £60 |
| iPhone 12 / 12 Pro | £12 to £20 | £50 to £80 |
| iPhone 13 Pro Max | £20 to £30 | £70 to £100 |
| iPhone 14 Pro | £22 to £30 | £75 to £110 |
DIY approaches can be more affordable but carry higher risk if not done carefully. For those on a tight budget, exploring cheap iPhone 11 repair options or looking at affordable phone screen fixes can reveal savings you didn’t know were available.
Once you know the price drivers, comparing the different repair routes is easier.
DIY vs professional repair: Which saves more?
This is the question most people land on once they’ve seen the price difference. The honest answer is: it depends on your confidence, your tools, and how much you value your time.
DIY repair has real advantages. The up-front cost is lower, you control the timeline, and there’s genuine satisfaction in fixing something yourself. For someone who’s comfortable with small electronics and has a steady hand, camera glass replacement on many iPhone models is achievable.
But the risks are real too. A mistake during removal can crack the camera module itself, turning a £15 part cost into a £150 repair. Most professional shops also offer limited warranties, while DIY fixes do not. If something goes wrong after a self-repair, you’re on your own.
Here’s a side-by-side comparison:
| Factor | DIY | Professional |
|---|---|---|
| Cost | Lower (part only) | Higher (part + labour) |
| Speed | Immediate | 1 to 3 days typically |
| Warranty | None | Usually 30 to 90 days |
| Risk level | Moderate to high | Low |
| Skill required | Moderate | Handled for you |
Pro Tip: If you’re attempting a DIY repair for the first time, order two sets of the camera glass. Adhesive strips can fail on the first attempt, and having a spare saves you from waiting for a second delivery.
To decide which route suits you, work through these steps:
- Check whether your iPhone is still under Apple warranty or AppleCare+, as a professional repair may be covered.
- Assess your comfort level with small, fiddly electronics work honestly.
- Compare the cost of a quality part against the total professional repair quote for your model.
- Look at the iPhone 12 replacement costs as a benchmark if you’re unsure what professional pricing looks like.
- Factor in the value of your phone. A high-end model warrants more caution.
With both cost and approach clear, many want to try the repair themselves.
Step-by-step: Safely replacing your iPhone camera glass
Before you start, gather everything you need. Rushing into a repair without the right tools is the most common cause of avoidable damage.
Essential tools and parts:
- Replacement camera glass (correct model-specific part)
- Pentalobe screwdriver (for iPhone base screws)
- Suction cup and plastic pry tools
- Tweezers
- Adhesive strips or UV-cure adhesive
- Heat gun or hairdryer (to soften existing adhesive)
- Clean, lint-free cloth
- Anti-static mat if available
It is essential to use the correct tools and protective equipment when replacing iPhone camera glass to avoid additional damage. Skipping any of these items increases the chance of something going wrong.
Follow these steps carefully:
- Power off your iPhone completely before starting.
- Gently warm the camera area with a heat gun for 20 to 30 seconds to soften the adhesive beneath the glass.
- Use a suction cup to lift the cracked glass slightly, then slide a plastic pry tool underneath.
- Work slowly around the edges, never forcing the tool. Patience here prevents cracking the module beneath.
- Lift the broken glass away cleanly and remove any adhesive residue with a plastic scraper.
- Clean the surface thoroughly with a lint-free cloth before placing the new glass.
- Apply the adhesive strip or UV adhesive evenly around the edge of the new glass.
- Press the replacement glass firmly into place and hold for 60 seconds.
- Power the phone back on and test all camera modes, including video and portrait.
Pro Tip: Always test in a well-lit room after installation. If you notice any fogging inside the lens, the seal isn’t complete and moisture may enter. Redo the adhesive step before it becomes a problem.
Where to find reliable parts:
- UK-based specialist repair retailers with model-specific listings
- Established online platforms with clear quality grading
- Suppliers offering buying quality iPhone lens parts with OCA adhesive pre-applied for a cleaner finish
Having tackled the hands-on, it’s wise to consider a fresh perspective from repair experts.
What most people get wrong about iPhone camera glass repair
After seeing countless repairs handled both well and badly, one pattern stands out clearly. People consistently underestimate the precision this job demands. Camera glass sits over a sensitive optical assembly, and even slight misalignment during installation can affect focus quality in ways that aren’t immediately obvious. You might think the repair looks fine, only to notice soft edges in your photos weeks later.
The short-term saving of a DIY repair on a premium iPhone can quietly become a larger expense. A damaged camera module costs significantly more to replace than the original glass. For high-value models, the professional route often makes more financial sense once you account for the warranty, the expertise, and the time saved.
That said, DIY is entirely sensible for older or mid-range models where the stakes are lower. The key is being honest about your skill level rather than optimistic. Reviewing iPhone 8 repair tips gives a useful sense of what a manageable DIY repair actually looks like compared to more complex modern devices. Matching the approach to the phone’s value and your own ability is the decision most people skip, and it’s the one that matters most.
Find quality iPhone camera repair parts and support
Whether you’re tackling the repair yourself or simply want to understand your options, having access to reliable parts makes all the difference. At Buy2Fix, we stock a wide range of genuine and compatible iPhone camera glass replacements, complete installation kits, and the adhesive tools you need for a clean finish. Every part is quality-checked before dispatch, and we offer free UK mainland shipping with a one-year warranty on components. Our team is on hand to help both first-time DIYers and experienced technicians find exactly the right part for their model, quickly and without fuss.
Frequently asked questions
How much does iPhone camera glass replacement typically cost in the UK?
Replacement costs range from £10 to £30 for the part alone, with professional repair adding £30 to £100 on top depending on your iPhone model and the service provider you choose.
Can I replace my iPhone camera glass myself?
Yes, with the right tools and a careful approach, many users manage a successful DIY replacement. However, DIY carries higher risk than professional repair and will typically void your Apple warranty.
Where can I buy quality replacement camera glass for my iPhone?
Look for UK-based specialist retailers with model-specific listings and clear quality grading. Platforms like Buy2Fix offer reliable parts with fast delivery and warranty coverage, which is particularly useful if you want confidence in what you’re buying.
Does fixing the camera glass affect my iPhone’s warranty?
DIY repair will almost always void your Apple warranty, while repairs carried out by Apple or an authorised service provider may preserve it. Always check your warranty status before proceeding with any repair.
Recommended
Let customers speak for us
For Samsung Galaxy A26 SM-A266B Original Earpiece Speaker with Cable

Very good communication throught. Good product

Well made part very strong easy to fit great value for the money

Well packed, with fast shipping :)

Exactly what the doctor ordered…great color, comfort, and durability. Trust this watch band!

Brilliant strap, second purchase, bought bracelet before. Excellent value. Thank you

Great item for splitting your Audio signal

Outstanding product!
Next level customer service.

Very satisfied but the delivery needs to get more faster...

Good price,quick delivery

Best phone case ever! This is my second one as I broke my first. Would defo recommend

Great fitting Apple Watch bands

For Apple Watch Ultra 3 / 2 / 1 49mm RedPepper Armor Metal Case Integrated Silicone Watch Band(Steel Black White)

Good price and quick postage

