
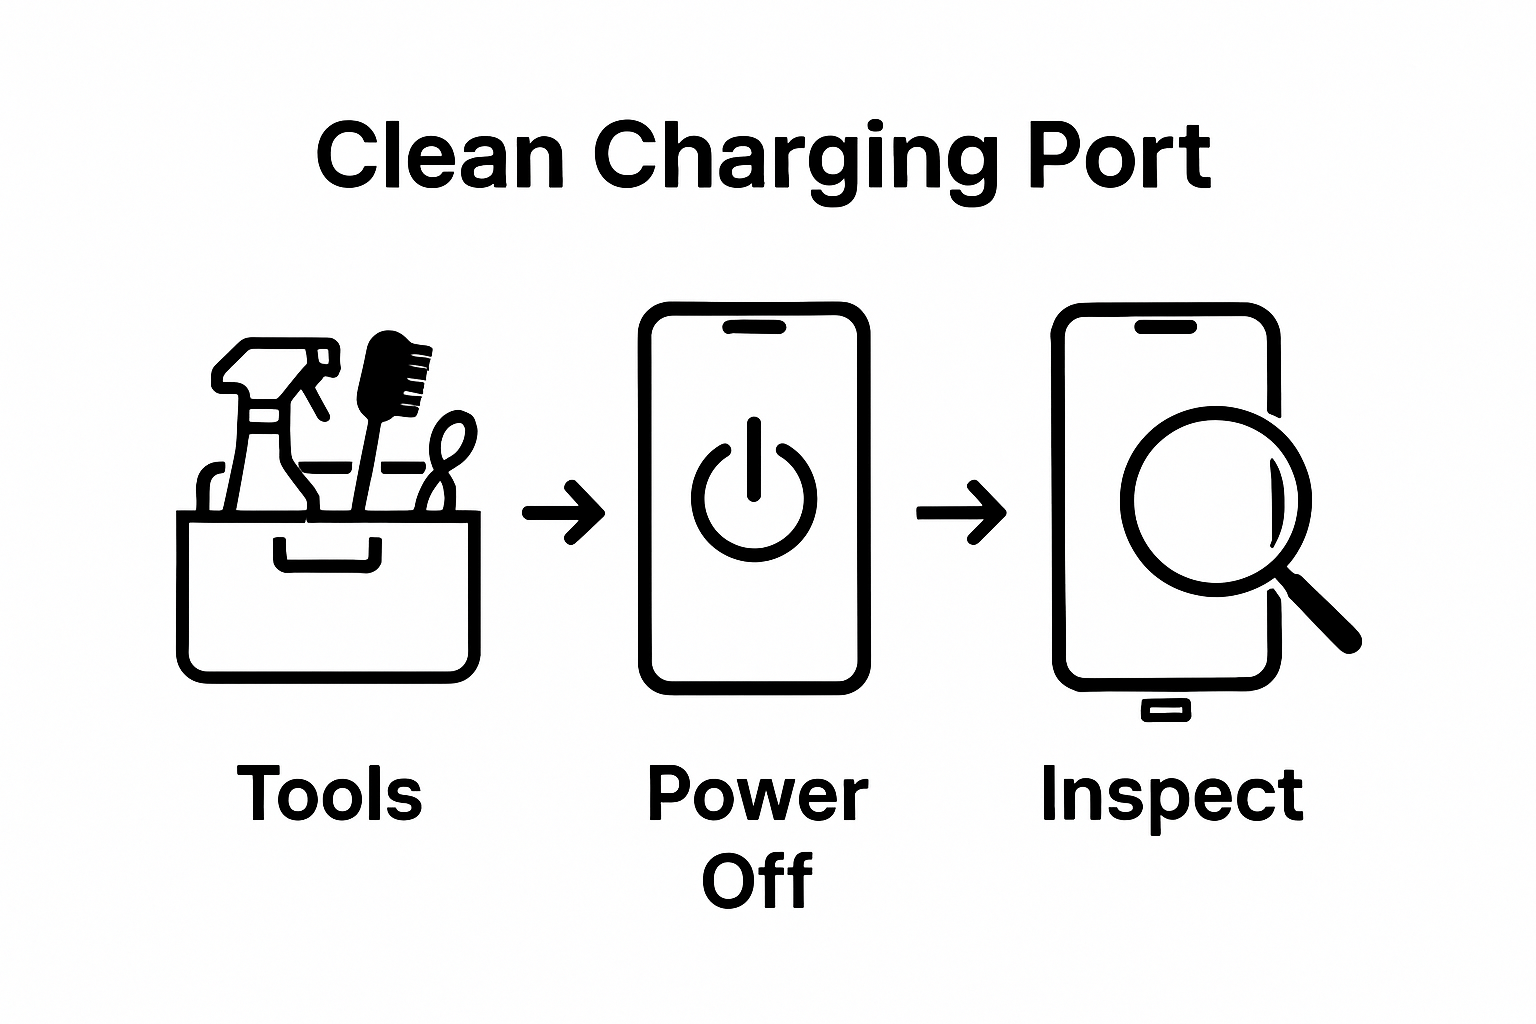
How to Clean Charging Ports for Optimal Device Performance
Most people blame a faulty cable or battery when their phone stops charging but the real culprit often hides in plain sight. Shockingly, charging port debris causes up to 50 percent of charging failures in smartphones. Clean your charging port the right way and you might just save yourself a trip to the repair shop.
Table of Contents
- Step 1: Gather Your Cleaning Materials
- Step 2: Power Off Your Device
- Step 3: Inspect the Charging Port Thoroughly
- Step 4: Clean the Charging Port with Precision
- Step 5: Test the Charging Functionality
Quick Summary
| Key Point | Explanation |
|---|---|
| 1. Gather precise cleaning tools. | Use a soft brush, compressed air, toothpick, alcohol, and microfibre cloth for effective cleaning. |
| 2. Power off your device completely. | Ensures safety by eliminating electrical risks during the cleaning process. |
| 3. Inspect the charging port thoroughly. | Identify debris type and extent to tailor your cleaning approach and avoid damage. |
| 4. Clean with great precision. | Use light, controlled movements to remove debris without harming internal components. |
| 5. Test charging functionality after cleaning. | Confirm that the device charges smoothly and safely post-cleaning to ensure no issues persist. |
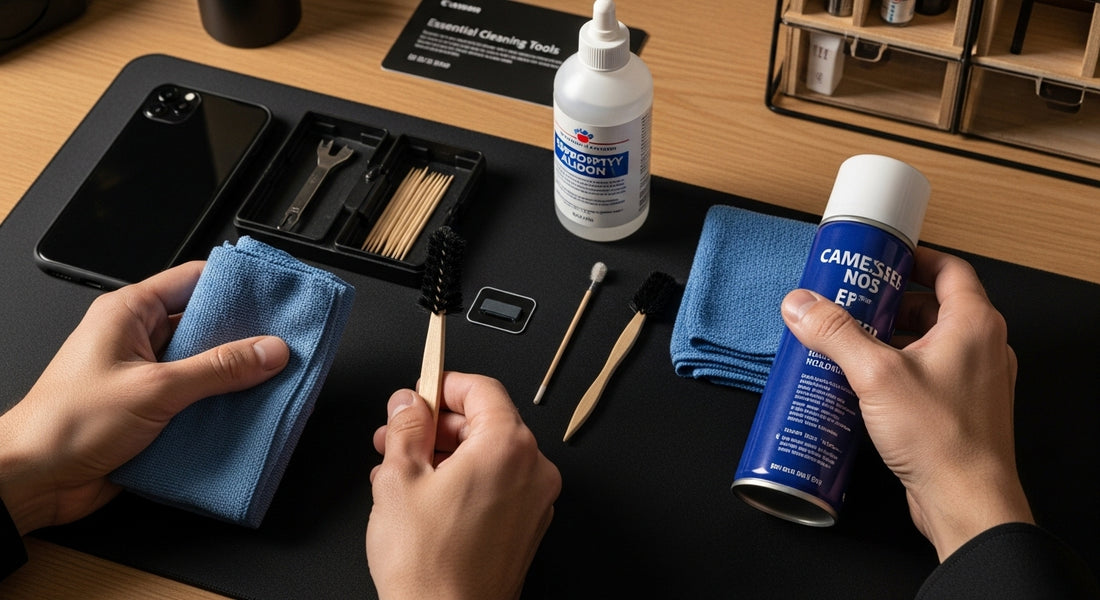
Step 1: Gather Your Cleaning Materials
Before diving into the delicate process of cleaning charging ports, assembling the right tools is crucial for achieving optimal results without risking device damage. The key is selecting precision instruments that can safely remove debris while protecting your smartphone’s sensitive electronic components.
Essential Cleaning Tools
To successfully clean charging ports, you will need a carefully curated set of tools that balance effectiveness and gentleness. Your primary toolkit should include:
- Soft-bristled brush: A brand new, clean toothbrush or electronics-specific soft brush
- Compressed air canister: Designed for electronics cleaning
- Wooden or plastic toothpick: For precise debris removal
- Isopropyl alcohol (90% concentration or higher): Technical-grade cleaning solution
- Lint-free microfibre cloth: Prevents scratching and absorbs moisture
When selecting these tools, prioritise items specifically designed for electronics. A standard household toothbrush might seem convenient, but electronics-grade brushes with ultra-soft, non-conductive bristles provide superior protection. Similarly, opt for compressed air canisters explicitly marketed for electronic device cleaning, which offer controlled, moisture-free air streams.
The wooden or plastic toothpick serves as your precision instrument for carefully dislodging compacted dust and lint. Crucially, avoid metal picks or needles, which can permanently scratch or puncture delicate charging port surfaces. Wooden toothpicks offer a perfect balance between rigidity for debris removal and softness to prevent internal damage.
Isopropyl alcohol acts as your cleaning solution, capable of dissolving stubborn grime without leaving residue. The high concentration ensures rapid evaporation, minimising potential moisture damage. A lint-free microfibre cloth completes your toolkit, providing a soft surface for final cleaning and moisture absorption.
By meticulously preparing these tools, you set the foundation for a safe and effective charging port cleaning process.
The following table organises the essential cleaning tools recommended in the article, including their purpose and special usage considerations when cleaning your device’s charging port.
| Tool/Material | Purpose | Special Considerations |
|---|---|---|
| Soft-bristled brush | Dislodge and sweep away loose debris | Use electronics-grade; avoid stiff bristles |
| Compressed air canister | Remove dust and particles with gentle airflow | Hold at least 10 cm away; short bursts only |
| Wooden/plastic toothpick | Precisely lift out compacted lint or dust | Never use metal; avoid excessive force |
| Isopropyl alcohol 90% D | Dissolve stubborn grime | Apply sparingly with microfibre cloth |
| Lint-free microfibre cloth | Wipe and absorb moisture; finish cleaning | Ensure no lint left behind after wiping |
| Each item plays a specific role in restoring your device’s connection integrity without risking inadvertent damage. |
Step 2: Power Off Your Device
Before embarking on the delicate task of cleaning your device’s charging port, powering off your smartphone or tablet is a critical safety step that protects both your device’s internal components and prevents potential electrical hazards. Proper device shutdown eliminates the risk of short-circuiting or causing unexpected electrical interactions during the cleaning process.
Shutdown Procedure
To safely power down your device, the process varies slightly depending on your specific smartphone model. For most modern smartphones, the shutdown sequence involves pressing and holding the power button located on the side or top edge of the device. On iPhones, this means pressing and holding the side button and either volume button simultaneously until the power off slider appears. Android devices typically require pressing and holding the power button until a menu with “Power off” or “Shut down” option emerges.
It is crucial to perform a complete shutdown, not just activate sleep mode or lock the screen. A full power-off ensures that no background processes continue running and eliminates any potential electrical current within the device. If your device has a removable battery, an additional step of physically removing the battery provides an extra layer of electrical isolation.
While powering down might seem straightforward, some users make common mistakes that could compromise device safety. Never force restart or use hardware buttons aggressively during the shutdown process, as this might trigger unexpected system responses. For devices experiencing software glitches that prevent standard shutdown, consult the manufacturer’s support documentation or seek professional assistance.
Additionally, if your device is connected to a charging cable or power source, disconnect it completely before initiating the shutdown. Unplug the charging cable from both the device and the power outlet to ensure total electrical isolation. This step prevents any potential electrical interference or unexpected power surges during the cleaning process.
Once your device is completely powered off, you can confidently proceed to the next cleaning stages, knowing you have minimised electrical risks and prepared your device for careful port maintenance. The brief moment spent on proper shutdown is a small investment that significantly reduces the likelihood of accidental damage during the cleaning procedure.
Verification is simple: your device screen should be completely black, with no illumination or active indicators. Wait a few seconds after shutdown to confirm total device inactivity before beginning your charging port cleaning process.
Step 3: Inspect the Charging Port Thoroughly
Before beginning any cleaning process, a meticulous visual and physical inspection of your device’s charging port is essential. This critical step allows you to understand the specific type and extent of debris accumulation, ensuring you apply the most appropriate cleaning technique without risking device damage.
To conduct a comprehensive inspection, you will need a reliable light source such as a smartphone flashlight or a small LED torch. Natural daylight near a window provides excellent illumination, allowing you to observe the charging port’s intricate details with precision. Hold your device at a comfortable angle that maximises visibility, typically with the charging port facing towards the light source.
Begin by examining the port’s internal metallic contacts and surrounding areas. Look for telltale signs of contamination including:
- Visible lint or dust accumulation
- Discoloured or oxidised metal contacts
- Compressed debris between connector pins
- Signs of corrosion or moisture damage
- Bent or misaligned charging port components
The type of debris you observe will significantly influence your subsequent cleaning approach. Loose dust requires different handling compared to compacted lint or potential corrosion. Pay particular attention to the small metal pins inside the port, as these are crucial for establishing a proper electrical connection. Bent or damaged pins can permanently impair charging capabilities and might necessitate professional repair.
Magnification can be an invaluable tool during this inspection. If you have access to a magnifying glass or smartphone macro lens, use it to gain a more detailed view of the port’s internal structure. This enhanced perspective allows you to identify minute debris particles that might be invisible to the naked eye.
Carefully rotate your device, examining the charging port from multiple angles. Some debris might be tucked into corners or wedged alongside connector walls, requiring careful observation. Avoid using metal tools or excessive force during inspection, as this could potentially damage the delicate internal components.
As you conclude your inspection, mentally catalogue the type and extent of debris present. This assessment will guide your subsequent cleaning strategy, helping you select the most appropriate tools and techniques. A thorough initial inspection not only prepares you for effective cleaning but also helps you understand your device’s current condition and potential maintenance needs.
Successful inspection is characterized by a clear, comprehensive understanding of the charging port’s condition. You should be able to identify the specific cleaning challenges your device presents, setting the stage for a precise and careful cleaning process.
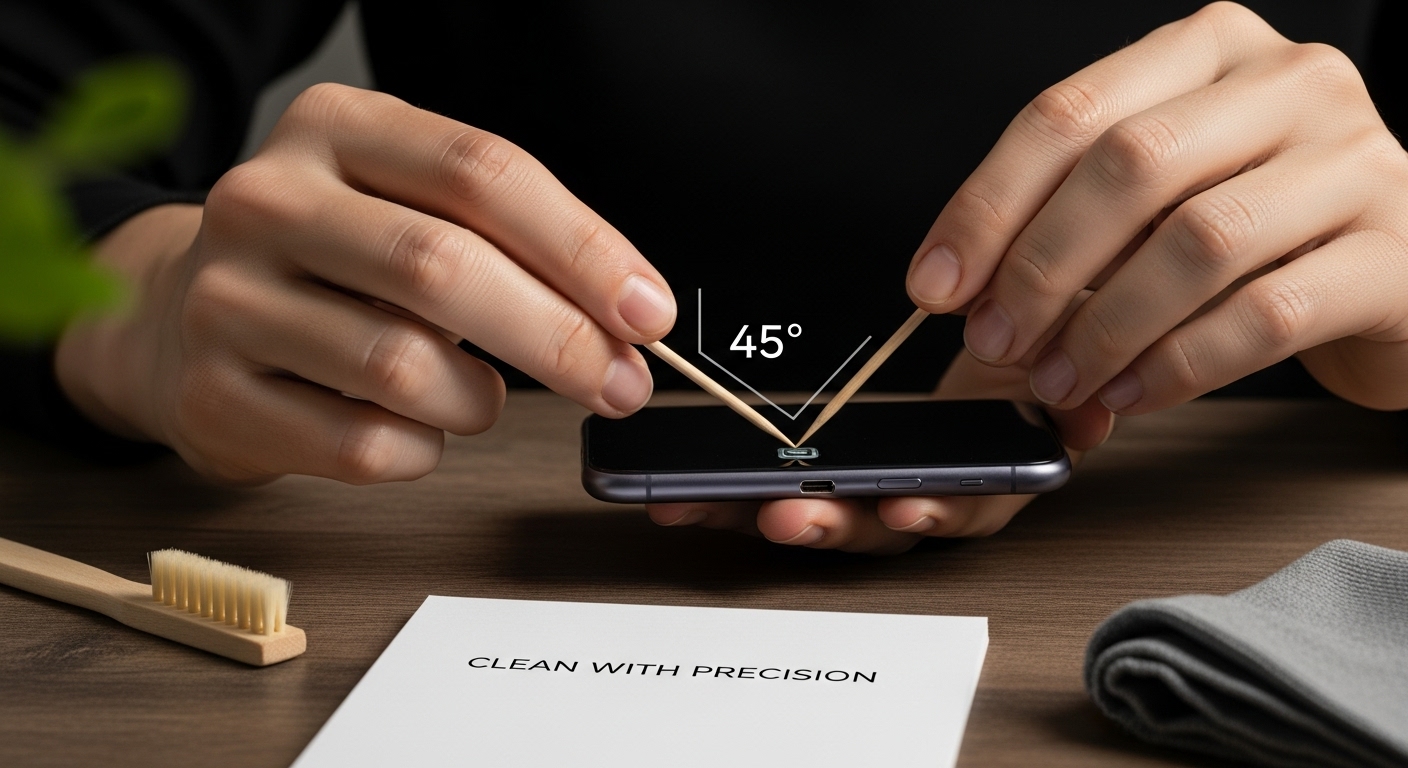
Step 4: Clean the Charging Port with Precision
Cleaning your device’s charging port requires an extraordinarily delicate approach that balances thoroughness with extreme caution. The goal is to remove accumulated debris without causing any mechanical or electrical damage to the sensitive internal components.
Begin by selecting your wooden or plastic toothpick and positioning it at a 45-degree angle relative to the charging port. This precise angle allows for controlled, gentle movement that minimises the risk of scratching or pushing debris deeper into the port. Carefully and lightly drag the toothpick along the port’s interior edges, using minimal pressure to dislodge compacted dust and lint.
For stubborn debris, your soft-bristled brush becomes an invaluable tool. According to Consumer Reports, a clean, dry brush can effectively remove particles without risking internal damage. Gently sweep the brush across the port’s interior, using soft, controlled motions that allow loose particles to fall away naturally.
If microscopic debris remains after manual removal, compressed air provides a non-invasive solution. Hold the compressed air canister at least 10 centimetres away from the charging port and use short, controlled bursts. Avoid prolonged air streams, which might inadvertently push debris further into the device or create moisture condensation.
When dealing with more persistent grime, isopropyl alcohol becomes your precision cleaning solution. Apply the alcohol sparingly by lightly dampening your lint-free microfibre cloth. Never directly pour or spray liquid into the charging port. Instead, gently dab the cloth’s corner against the port’s exterior edges, allowing capillary action to draw the cleaning solution into tight spaces.
Crucial cleaning techniques to remember:
- Always use light, controlled movements
- Never insert metal objects into the charging port
- Avoid excessive moisture or liquid
- Work in a well-lit, clean environment
- Take breaks if you feel uncertain or fatigued
Potential challenges might include deeply embedded debris or signs of oxidation. If your initial cleaning attempts prove ineffective, resist the temptation to apply more force. Persistent issues might indicate more significant internal problems requiring professional intervention.
Verification of successful cleaning involves carefully examining the port under good lighting. The interior should appear cleaner, with visible debris removed and metal contacts looking bright and unobstructed. Gently test the charging cable’s connection to ensure smooth insertion without resistance.
Remember, patience and precision are your greatest allies in this delicate process. A methodical, gentle approach will help maintain your device’s charging port integrity and functionality.
Step 5: Test the Charging Functionality
After meticulously cleaning your device’s charging port, systematic testing becomes crucial to verify that your maintenance efforts have successfully restored optimal charging performance. This final step ensures that all your careful cleaning has not inadvertently caused any additional complications.
Begin with a high-quality, original charging cable that you know is fully functional. Avoid using damaged or third-party cables that might provide unreliable testing results. Inspect the cable’s connection points for any visible damage or wear before proceeding with the test.
Gently insert the charging cable into the port, paying close attention to the insertion process. A clean charging port should allow smooth, unobstructed cable connection without requiring excessive force or wiggling. The cable should slide in comfortably, with a consistent and secure fit. Any resistance or unusual friction could indicate remaining debris or potential port damage.
Once connected, observe your device’s charging indicators carefully. Most smartphones display specific signals that confirm successful charging:
- Battery icon appears with charging animation
- LED indicator lights up
- Screen illuminates with charging status
- Battery percentage begins incrementing
Watch the charging process for several minutes, monitoring both the physical connection and the device’s response. Intermittent charging or inconsistent connection might suggest additional cleaning or potential hardware issues that require professional assessment.
If your initial test reveals any irregularities, do not panic. Carefully disconnect the cable and repeat the cleaning process, potentially using compressed air for a more thorough debris removal. Sometimes, a second gentle cleaning can resolve lingering connection problems.
Pay particular attention to charging speed and stability. A successfully cleaned port should demonstrate:
- Consistent charging without interruption
- Normal charging speed
- No unusual heating around the charging port
- Stable electrical connection
Should you encounter persistent charging difficulties after multiple careful cleaning attempts, this may indicate more significant internal damage. In such scenarios, professional diagnostic services become necessary. Continuing to force connections or performing aggressive cleaning could potentially cause irreparable harm to your device’s charging system.
Successful testing means your device charges smoothly, maintains a stable connection, and shows no signs of electrical irregularities.
Below is an at-a-glance checklist to verify successful cleaning and device readiness before and after restoring your charging port for optimal performance.
| Verification Step | What to Check | Criteria for Success |
|---|---|---|
| Device powered off | Screen completely black and unresponsive | No lights or activity present |
| Charging port visual inspection | No dust, lint, or visible debris inside port | Port looks clean and unobstructed |
| Metal contacts condition | Contacts free of corrosion, oxidation, or discolouration | Metal appears bright and intact |
| Cable connection fit | Charging cable inserts smoothly without resistance | Snug, consistent fit; no wiggling |
| Charging indicators observed | Charging icons, LEDs, or battery percentage increase | Device shows normal charging signals |
| Charging speed and stability | Device charges at usual rate; no interruptions or heating | Stable power delivery; normal temp |
| The charging port should feel clean, unrestricted, and function exactly as it did before accumulating debris. |
Remember, patience and gentle handling are key throughout this process. Your methodical approach protects your device’s long-term functionality and prevents unnecessary repair costs.
Restore Reliable Charging and Prevent Future Device Issues
If cleaning your charging port gave only temporary improvement or you discovered physical damage during inspection, you are not alone. Many users face stubborn issues such as worn connectors, damaged pins, or persistent debris that gentle home cleaning cannot resolve. A faulty charging port not only disrupts your daily routine but can also lead to costly device replacements if left unaddressed.
Instead of living with unreliable charging, explore our vast range of quality-tested charging ports and repair components for iPhone, Samsung, Huawei, Xiaomi, and more at Buy2fix. Each part is selected to match the precision your device needs. If you are working on a more involved repair, everything from LCD screens to flex cables and SIM trays is available on our site, ensuring you never get stuck mid-repair. Worried about installing parts yourself? Our expert guidance and professional installation recommendations give you added confidence. Regain peace of mind and lasting device performance. Visit Buy2fix.co.uk to order the components your device really needs and experience the benefits of top-tier aftermarket or genuine parts, all with fast UK shipping and a 30-day guarantee. Take the next step to uninterrupted charging now.
Frequently Asked Questions
What tools do I need to clean my device’s charging port?
You will need a soft-bristled brush, a compressed air canister, a wooden or plastic toothpick, isopropyl alcohol (90% concentration or higher), and a lint-free microfibre cloth. These tools are designed to clean electronics safely without damaging sensitive components.
How can I ensure my device is safe to clean?
Before cleaning, power off your device completely to prevent electrical hazards. Additionally, disconnect it from any charging sources to ensure total electrical isolation, minimising the risk of short-circuits during the cleaning process.
How should I inspect the charging port before cleaning?
Use a reliable light source to visually inspect the charging port for lint, dust, or signs of corrosion. Look for obstructions between the connector pins and examine the metal contacts for discolouration or damage.
What should I do if my charging port isn’t working after cleaning?
If the charging port does not function properly after cleaning, try repeating the cleaning process to remove any remaining debris. If issues persist, it may indicate deeper internal damage, requiring professional diagnostic services.
Recommended
Let customers speak for us
Best phone case ever! This is my second one as I broke my first. Would defo recommend

Great fitting Apple Watch bands

For Apple Watch Ultra 3 / 2 / 1 49mm RedPepper Armor Metal Case Integrated Silicone Watch Band(Steel Black White)

Good price and quick postage

Perfect fit.

Absolutely necessary

Second Purchase and still a very happy customer. Keep up the good work.


For Xiaomi Smart Band 9 Active / Redmi Band 3 Mijobs Metal Shell Silicone Watch Band(Grey Silver)

Was worried I’d have to buy a new vacuum as mine had gone outside of the 2-year warranty, and all for a snapped clip. Really good replacement and easy to fit.

Exactly what I needed. Perfect to size. Fresh look!

Excelent service

For Garmin Venu 3 22mm Two Color Textured Silicone Watch Band(White+Grey)

Looks great and suites the purpose. Decent quality

Product was exactly as advertised. Happy with the process and this company.
